
I have survived! Just about! I always forget just how much energy goes into the first week of school. Anyway, I managed to get a few snaps to show you around our grade 4 PYP classroom. Here's the first board. The students wrote their yearly goals on the popcorn pieces and wrote the Learner Profile attribute they related to. Also, how cute are the dog pegs we have in our school corridors?

Here's the view from the back of the room. I kept my cacti on the teacher board (They make me happy!). See how I crafted them here. I made the clock labels last year with the free digital papers from Jena Hudson at Sew Much Music.

I've displayed the PYP key concepts on the bottom of the board. I got these fantastic keys for free from Ms. Murdoch. When the students create initial questions at the start of a unit of inquiry, we have a discussion to categorise them according to the key concepts and stick them on post-it notes above the laminated keys. I have also attached my remote controls to the side of the board using adhesive velcro squares. I can guarantee I'd lose them otherwise!


I kept more or less the same calendar / self-assessment / Student of the Week display as last year. I'm still in love with this grey and mint calendar. The way I did "Student of the Week" worked very well last year. I choose a student on Monday to be our Student of the Week. The other students are encouraged to note instances where they demonstrate attributes of the Learner Profile. They can add this to the sheet. The sheet will be given to the student at the end of the week. As you can see, this sheet is put on with little pegs so it's easy to change weekly. Also on this display you'll see some reflection posters based on Marzano's Levels of Understanding. I have similar ones in my TPT store but I edited these so they fit with the colour-scheme on this board.

This is going to be built up to be an international corner. Here is where we record the greeting we use for the register (we choose a new language each Monday). The students are already excited to use this Rugby World Cup wall chart to mark in their team's scores. I look forward to seeing how they get on with this target board (rugby-themed of course! It's part of my Rugby World Cup resource pack).


Here you can see our Class Agreements already up. The students chose to do them on a giant sheet of paper! And the "Magic Maths Words" display is still going strong. The students will add useful words to it as the year goes on to help with problem-solving e.g. multiplication words could be "multiply," "groups of," "by," "double," "times," etc. I got the title banner from Sparklebox, the symbols from Fun for Learning and the adhesive googly eyes from Flying Tiger. Above those are these multiple posters (from Twinkl) which proved to be a very useful aid for some students last year. It's also very handy that I can cover them up with a blind if I need to hide that visual aid! They're free, even if you don't have a paid Twinkl membership.


In line with the enhanced PYP, I've updated the header on my ex-transdisciplinary skills posters so it now reads "Approaches to Learning." As you can see, the Learner Profile header is up on the door. On the second day, the students worked collaboratively on Google Sheets to create their own posters for each of the Learner Profile attributes. I then cut out a small, laminated photograph of each child. They move their own/ somebody else's photograph to the Learner Profile attribute they catch them displaying. We did this last year and it worked really well.
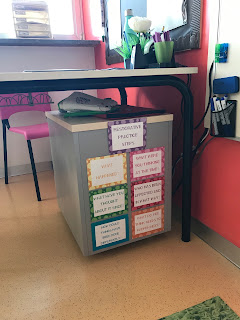
These restorative practice steps posters are a new purchase from @teacher_elaine_ (formerly Diary of an NQT)'s mash.ie store. I placed them on the back of my locker so they are close to use when we have circle time.


If you look closely in the last big picture, you can see this inquiry cycle poster in the middle of the big board. I got the circle graphic from Mr. PYP and I created the header using Twinkl Create. I've left the rest of the board blank so that we can add to it as we go through the stages of the inquiry cycle together, documenting along the way. Stand by for future posts on that!

And I love this little action board in the reading/reflection corner. I thought it would be nice here as the students can spend some time pondering on their ideas. I got these action posters from Susan Powers. If you are a PYP teacher and you don't know her blog PYP Teaching Tools, GET ON IT!!! She has amazing ideas and resources and you will be full of inspiration. She has also started a series of videos which are great for teachers who are new to the PYP to get their head around inquiry-based learning in PYP schools. I also picked up these action cycle posters from The Classroom Contessa.

Up high you can see another new purchase, these Developing IB PYP Student-Led Action posters, again from the magnificent Susan Powers. I can't wait to use her planning templates so students can plan their action and reflect on it. I've left two boards blank for the students to create displays as they learn.


And last but not least, our Burning Questions board. Again, I've put the key concepts around it (I used the little ones from my UOI display kit mentioned above). We did this last year and it really helped the students to understand the key concepts.
Thanks for taking the time to virtually visit our learning space!
No comments:
Post a Comment