Showing posts with label classroom decor. Show all posts

Sunday, 8 September 2019

Grade 4 PYP Classroom Reveal

I have survived! Just about! I always forget just how much energy goes into the first week of school. Anyway, I managed to get a few snaps to show you around our grade 4 PYP classroom. Here's the first board. The students wrote their yearly goals on the popcorn pieces and wrote the Learner Profile attribute they related to. Also, how cute are the dog pegs we have in our school corridors?
 
Here's the view from the back of the room. I kept my cacti on the teacher board (They make me happy!). See how I crafted them here. I made the clock labels last year with the free digital papers from Jena Hudson at Sew Much Music.


I've displayed the PYP key concepts on the bottom of the board. I got these fantastic keys for free from Ms. Murdoch. When the students create initial questions at the start of a unit of inquiry, we have a discussion to categorise them according to the key concepts and stick them on post-it notes above the laminated keys. I have also attached my remote controls to the side of the board using adhesive velcro squares. I can guarantee I'd lose them otherwise!


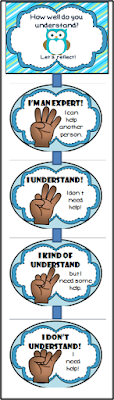
I kept more or less the same calendar / self-assessment / Student of the Week display as last year. I'm still in love with this grey and mint calendar. The way I did "Student of the Week" worked very well last year. I choose a student on Monday to be our Student of the Week. The other students are encouraged to note instances where they demonstrate attributes of the Learner Profile. They can add this to the sheet. The sheet will be given to the student at the end of the week. As you can see, this sheet is put on with little pegs so it's easy to change weekly. Also on this display you'll see some reflection posters based on Marzano's Levels of Understanding. I have similar ones in my TPT store but I edited these so they fit with the colour-scheme on this board.


This is going to be built up to be an international corner. Here is where we record the greeting we use for the register (we choose a new language each Monday). The students are already excited to use this Rugby World Cup wall chart to mark in their team's scores. I look forward to seeing how they get on with this target board (rugby-themed of course! It's part of my Rugby World Cup resource pack).


Here you can see our Class Agreements already up. The students chose to do them on a giant sheet of paper! And the "Magic Maths Words" display is still going strong. The students will add useful words to it as the year goes on to help with problem-solving e.g. multiplication words could be "multiply," "groups of," "by," "double," "times," etc. I got the title banner from Sparklebox, the symbols from Fun for Learning and the adhesive googly eyes from Flying Tiger. Above those are these multiple posters (from Twinkl) which proved to be a very useful aid for some students last year. It's also very handy that I can cover them up with a blind if I need to hide that visual aid! They're free, even if you don't have a paid Twinkl membership.




In line with the enhanced PYP, I've updated the header on my ex-transdisciplinary skills posters so it now reads "Approaches to Learning." As you can see, the Learner Profile header is up on the door. On the second day, the students worked collaboratively on Google Sheets to create their own posters for each of the Learner Profile attributes. I then cut out a small, laminated photograph of each child. They move their own/ somebody else's photograph to the Learner Profile attribute they catch them displaying. We did this last year and it worked really well.

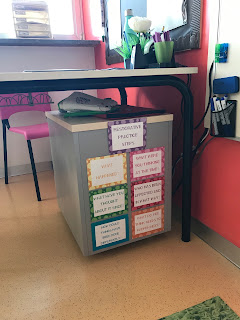
These restorative practice steps posters are a new purchase from @teacher_elaine_ (formerly Diary of an NQT)'s mash.ie store. I placed them on the back of my locker so they are close to use when we have circle time.


Here's the back of our classroom. The Italian board was done by the Italian teacher and the other is a central unit of inquiry board. I've used resources from by Unit of Inquiry Bulletin Board Display Kit to display the important information. For now, I will continue to use this polkadot behaviour management clip chart that I got for free from Under The Alphabet Tree (on the tall bulletin board). It has worked very well for my classes in the past and it is used school-wide. Having read quite a few articles online this weekend about the effect it can have on children, I'm going to reflect on if I want to continue with this tool. I try to keep it as positive as possible and adjust expectations according to individual students' needs. If the clip chart doesn't work for a student, a separate individual behaviour management system can be put in place so they don't feel that their peg is always at a lower point on the chart. I made a cute little "Are we being principled?" sign for above it. That sign has traveled with me through many rooms and grades!


If you look closely in the last big picture, you can see this inquiry cycle poster in the middle of the big board. I got the circle graphic from Mr. PYP and I created the header using Twinkl Create. I've left the rest of the board blank so that we can add to it as we go through the stages of the inquiry cycle together, documenting along the way. Stand by for future posts on that!


And I love this little action board in the reading/reflection corner. I thought it would be nice here as the students can spend some time pondering on their ideas. I got these action posters from Susan Powers. If you are a PYP teacher and you don't know her blog PYP Teaching Tools, GET ON IT!!! She has amazing ideas and resources and you will be full of inspiration. She has also started a series of videos which are great for teachers who are new to the PYP to get their head around inquiry-based learning in PYP schools. I also picked up these action cycle posters from The Classroom Contessa. 


Up high you can see another new purchase, these Developing IB PYP Student-Led Action posters, again from the magnificent Susan Powers. I can't wait to use her planning templates so students can plan their action and reflect on it. I've left two boards blank for the students to create displays as they learn.


And last but not least, our Burning Questions board. Again, I've put the key concepts around it (I used the little ones from my UOI display kit mentioned above). We did this last year and it really helped the students to understand the key concepts. 

Thanks for taking the time to virtually visit our learning space! 

Monday, 5 August 2019

Back to School Sale on TPT - Tuesday and Wednesday


It's that time of the year again - online sales time!

Teachers Pay Teachers is having a site-wide sale on Wednesday 1st and Thursday 2nd August. I'm having 20% off everything in my TPT store. In addition to that, TPT is offering another 5% off when you use the promotional code BTS19 at the checkout (Just make sure to select "Apply a Promo Code"). 

It starts at 4:01am GMT (Irish time!) on Tuesday 6th August and finishes at 3:59am GMT in the early hours of Wednesday 7th August. 

If you're looking for Rugby World Cup resources, now is the time to get them at a discount!

I've created some new categories to help make browsing easier. The "Irish Classrooms" category is for anything that might be of interest to Irish teachers (and not stuff for international schools).
Then you'll also find these new custom categories on the top left:
Behaviour Management
MYP
PYP
Stationery

Happy shopping!

Tuesday, 2 July 2019

Dip Starter Pack 2019-2020

As highly requested following feedback on my "Dip Tips" blog post, I created this Dip Starter Pack to save probationary teachers lots of time, effort and money. I've just updated it for the 2019-2020 school year. I couldn't help myself when making it and went a bit overboard in buying shabby chic and bullet journal style clip art! You'll see that theme running through the pack! :)

Here's what's in the 170 page pack: 
(the preview picture below doesn't show everything! Scroll down to read the full contents.)


PLANNING RESOURCES:
  • Example short-term (weekly) plans
  • Example long-term (termly) plans
  • Example cuntais míosúla
  • 9 cover sheets for your planning and assessment folders
  • Weekly planning checklists (3 sheets, one per term)
  • Editable checklists and information sheets (e.g. homework record, information for substitute teachers, birthday record, etc.)
  • Teacher calendar sheets (August 2019 - July 2020)
  • Editable international Events Calendar 2019-2020
  • A PDF copy of my "Dip Tips" blog post


ASSESSMENT RESOURCES:
  • Superhero-themed behaviour management tools including an editable token chart, token sheets, an editable behaviour record cover, goal-setting/reflection sheets, a behaviour frequency record with an example and instructions)
  • Two Stars and a Wish self-assessment sheets
  • Self-assessment display based on Marzano's Levels of Understanding
  • Self-assessment sheet based on Marzano's Levels of Understanding


DISPLAY RESOURCES:
  • Laethanta na Seachtaine display
  • Dathanna display
  • Prionta sa Timpeallacht (28 flashcards, 4 posters)
  • Na h-Ábhair Scoile circular display
  • Visual timetable pack (with editable cards)
  • WALT and WILF signs (for sharing objectives and assessment criteria)


Many of these resources are available individually (paid/free) in my TPT store. The total of the paid resources is $18.50. This bundle allows you to save $6.50 as it's priced at $12 (that's roughly €10.60). The example weeklies, termlies and cuntais míosúla are not sold separately. Those are a bonus just for this bundle! So, in summary, for just over a tenner (not a massive investment!) you'll get 170 pages of example plans, planning and assessment templates and classroom displays. 

Here's a closer look at just some of the things that are inside. Click on the images if you'd like to purchase these separately! Many are suitable for non-dip-doing teachers too!


These calendar sheets (not just for dip teachers!):


These bullet-journal inspired, washi-tape filled checklists to help you keep track of your planning (and fulfill your pretty stationery needs!): 
The dates in the preview are from a previous year but the actual file is updated for the 2019-2020 school year

These editable sheets for your teacher folder including a birthday tracker, editable information sheets for substitute teachers, lots of editable checklists that you could use for homework, phonics, spelling test records, recording specific objectives. (Again, not just for the dip!):


These pretty dip folder cover sheets (9 of them in total!). I also have editable versions in different styles for anybody not doing the dip:


These superhero-themed behaviour management tools for tackling individual children's behaviour. This pack includes a fully editable behaviour chart with editable tokens, a behaviour frequency record with an example and instructions and a cover sheet and goal-setting/reflection sheet to make a behaviour record book (FYI, my dip inspector loved seeing that record book!):


This prionta sa timpeallacht pack that contains 28 flashcards and 4 posters:


These visual timetable cards (includes editable cards):

 These circular chalkboard-style subject posters as Gaeilge:

This self-assessment chart based on Marzano's Levels of Understanding (with corresponding self-assessment sheets): Here's how it looked in my classroom last year!
         

Friday, 3 August 2018

Miraculous - Ladybug and Cat Noir Flip Sticks


Do you use flip sticks in your classroom? They're a very useful classroom management tool. You have two colours on a lollipop stick. Each child's name is written on one end. It's very easy to choose a child at random (fairly!) for a special job. If you want to keep track of who you have questioned, whose homework you have checked, etc. you can simply turn the sticks upside down and it's very easy to see who has not yet had a turn.


Last year the watermelon theme seemed to be EVERYWHERE on Pinterest. I jumped on that bandwagon and had these ones in my classroom. The children LOVED them. Though I was in love with the watermelon print when I made them, I wanted to make fresh colours for the coming school year. 

(TIP: If you want to reuse the same sticks, simply stick on the child's name on little pieces of paper with PVA glue - then you can peel it off and reuse the sticks the following year). 

I decided to go for a "Miraculous - Tales of Ladybug & Cat Noir" theme. I'm really happy with how they turned out! Even if children don't recognise where it comes from, they may still like the contrasting colours/animal print effect. If any of you have other suggestions for possible flip sticks themes with contrasting colours/patterns, please comment below!

Thursday, 26 July 2018

Tutorial: Mirrored Lettering Using Old CDs

How's the weather where you are? It's absolutely pouring here and has been all day. What better excuse to get in a day of crafting! I had been trying to think of ways to display the word "reflect" or "reflective" for the reflection area of the classroom. I was thinking about having the writing on a mirror-like background or maybe making tin foil (aluminum) letters. Then it hit me, why not make the lettering from old CDs? I'm really happy with the finished result. Here's it turned out. Scroll down to find instructions for how to do it.


Resources needed: A computer and printer, paper, thick card, black marker, PVA glue, paintbrush, scissors, craft knife, old CDs/DVDs, boiling water, heatproof container, towel ...and a LOT of patience!

1. Soak some CDs/DVDs in boiling water for 10 minutes. This will soften them and make them easier to cut. I did two at a time so they didn't cool down too much.


2. Take the CDs out of the water and dry them off.

3. Cut the CDs into tiny shapes. I realised that these were much too big for my letters so I ended up cutting them much smaller.


You'll might also be able to pull apart the two layers. This makes cutting easier. I was able to snap some pieces. NOTE: Snapping is a bit risky - my eyes are lucky to have survived! :)

4. Print your lettering. I used the Franklin Gothic Heavy pre-installed font in PowerPoint (size 287). Glue the lettering to some thick card and cut it with a craft knife.


5. (Optional) Get a black permanent marker and colour the rough edges so you can't see the colour of the card.

6. Cover the letters with PVA glue, small sections at a time, and stick your CD pieces on with small spaces between them. When you're finished sticking on all of the pieces, add a layer of PVA glue over everything just to seal it all in properly. It will look cloudy at first but it will dry clear and your CD lettering will be nice and shiny!


Thursday, 14 September 2017

IB PYP Unit of Inquiry Bulletin Board Display Kit

Well hello there! If you've seen my classroom reveal post, you'll know that I've added lots more information about my unit of inquiry to the central display board. Here it is:


I've created a display kit that I can use throughout the year and just switch in and out the necessary attitudes, Learner Profile attributes, key concepts, etc. I spent a lot of time making this and now have a kit that you can purchase from my TPT store. Here's a preview of what's in it. Scroll down below the picture to read about the full contents!


The kit contains headings (bunting-style) for:

  • Lines of Inquiry
  • Key Concepts
  • Transdisciplinary Theme
  • Central Idea
  • Learner Profile
  • PYP Attitudes
  • Approaches to Learning (as requested)
  • Student Work (as requested)

There are flashcards for each of the 6 Transdisciplinary Themes (both versions of organise/organize are included).

There are also mini posters of the key concepts, Learner Profile attributes and PYP attitudes. The clip art on these is the same as some of my other PYP resources. As everybody's central ideas and lines of inquiry are different, I haven't included a template for these.

If you are interested in purchasing this kit, pop over to my TPT store!

Here are some more pics of how they look printed and laminated!